Materials: 1" circular punch, bottle caps (cleaned and not bent), glue, Resin & the catalyst, old cookie tray, magnets.

1) Select your photos and print. I used a photo editing tool to scale my photos down to 1.5" square.
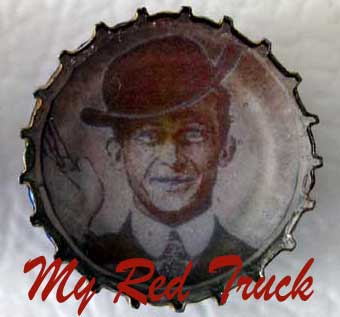
2) Using a 1" circular punch to cut out your photos. (I wouldn't recommend hand cutting) The circular punch can be picked up for under $10 at any craft store that sells scrapbook products.
3) Glue down your photos to the inside of your bottle cap. Note: Wash your caps before using and use only those that are flat and not bent.

6) Using Clear Casting Resin & the catalyst, follow the directions and mix the two together. I used the measurements for the 1/4" single cast technique. When they say mix in a well ventilated area they mean. This stuff SMELLS!!! So I would use this either outside or in a well ventilated garage.
7) Use an old cookie tray and place the bottle caps on the tray. You want a very even surface, mine was not and some of them are filled incorrectly. Once the catalyst is mixed with the resin pour the solution into your bottle caps. Note: Use gloves and you do not want this stuff on your hands. You need to fill each cap to the top and not over.
8) Allow to set over night and then you can hot glue the magnets on the back. You can also create thumbtacks instead!
I am thinking of doing some for family Christmas presents. The best one is that of my great great grandfather and is in Sepia. There was some distortion of colors but I don't think I waited for the glue to dry. Have fun and if you try it let me see!!! :-)


Hi there! I found you via Osage Bluff Quilter. Love your bottlecap project. I ordered supplies last week to make a similar project. Can't wait - but it's hard to find time to craft in the Summer!! Nice to meet you :) -Tammy
ReplyDeleteHello I popped over from Osage Bluff Quilter and I am glad I did.....very nice blog....Hugs
ReplyDeleteNo way can I do this project. It would make Pete feel as if he never has to get rid of his beer caps again.
ReplyDelete