Sunday, August 8, 2010

Freebie Friday! (and on time)!! :-)

The winner is Kim! (send me an email with your mailing address & your choice of either the ladybug or the rocket fabric. I will get this shipped out to you, congrats!
Still Time left to win the tic tac toe game of your choice!!! Leave a comment by 12 pm tonight!
Freebie Friday!
So I posted this past Sunday that I would make this worth your while and I hope I have! So as my previous post said about bottle caps I have collected quite a few last summer. I have been trying to think of all the different crafts I can do such as the bottle cap magnets. I have come up with a tic tac toe game for kids (or adults who still think they are kids) that can travel with you. Yes using bottle caps . .wait I know you are asking for kids are you sure? Bottle caps will go right into their mouths . .no they won't!
So here is a peek and information on the giveaway that I try to have (failed completely last week).


For the Give away: Reply to this post by Sunday 12pm and on Monday morning I will announce the winner. The winner will be determined by random generator and must be a US citizen (sorry but I can't afford international shipping! :-) You will have your choice of the Rocket baby fabric or the ladybug & dragon fly fabric.

I will post a separate post regarding how to create this tic tac toe game using bottle caps! Here are more pictures of the game. Oh and this is not intended for kids under 3 as they may try to chew on the game pieces which contain magnets.

Here are pictures of the game and the game pieces. There is a triangular pocket on the left that holds the game pieces and it all rolls up to be easy to put in a bag. The pieces are parts of the fabric laminated with a magnet attached. The game "board" has the bottle caps under each square with padding under the bottle cap so it doesn't rip through the bottom. So no little hands getting to those bottle caps (the caps have all been washed but are safely under the fabric).


Friday, August 6, 2010

Tic Tac Toe Game Instructions


Here is my attempt at documenting how to recreate this game. It had several iterations and I had trouble documenting this while my brain worked it out. To those of you that can do this my hat is off to you. This is far more difficult than I ever thought! :-)

Materials:

Fiberfil (stuffing - that white stuff that you stuff pillows and stuffed animals with.)
9 Bottle caps - washed and dried
10 magnets (make this the pro-magnets or heavy duty ones since they have to go through fabric).
Fabric, you will need two 9 1/2 X 9 1/2" squares. (Use light weight fabric for this as your magnets for your game pieces will need to go through the fabric.
Hot glue gun
>Items for your game pieces


Step one: Cut your square out of your desired fabric using pinking shears. Divide your square into 9, 3" squares (you need about a 1/4" all around for seams). I start by finding the center of the square and then measure from there. You will want to use chalk or pencil for this as you want it to show up. You can make your marked side be the back of the game.


Step two: Using your hot glue gun, place a quarter size portion of glue in the bottle cap (see picture) then place your fiberfill into the cap. You will want to make sure you have enough fiberfill to cover the edges but not too much to make the game too bulky.


Step Three: Place the two squares of fabric on top of each other making sure the marked side is on top. Using your zipper foot (so you can get close to the bottle caps) on your sewing machine sew your first lines to the left and right of the center column of squares. The picture doesn't show it however I recommend making two lines of stitching (see pictures of my freebie Friday post). This allows the game to fold up easier.


Step Four: Place your first bottle cap in the center of the square and then sewing your remaining lines. After the interior lines are sewn you can sew around the perimeter of the square. As you sew place your padded bottle caps into the squares. You will want to make sure that all your bottle caps are facing the right way!


Step Five: Make your game pieces. You can use the bottle cap magnet concept and do Xs and Os. Or as I did laminated fabric pieces, just glue the magnet to the back and you are ready to play. I thought of also using buttons, wood pieces from the craft store etc . . . Use your imagination to create a fun game. My daughter and I have fun with this game and I am always trying to entertain my two kids when we go out to eat.


Enjoy! Oh and I am sorry I don't have instructions to make the wrap to make this game portable. If you are crafty and can sew I know you will have no problems figuring this out. But I do intend plan on opening my Etsy store by the end of the summer and would like to sell these there. Don't want to give away all my secrets! :-)

Sunday, August 1, 2010

My apologies!!! Freebie Friday Flop!

Freebie Friday Flop!!!
I apologize to everyone who reads my blog regarding me not posting a freebie Friday item until Sunday August 1st. I had all intentions but Mother Nature took control and wiped out our Electricity and Internet service until late Friday. Then of course kids and visiting family took precedence! (Sorry, I have to confess my blog usually doesn't come before kids)! :-)
So here is my Freebie Friday post much belated with a promise to fulfill my Friday obligation this week (and make it worth your while).
Freebie Cleaning Tip!
I can't claim ownership of this and will warn you that you will hate me after reading the next sentence. My wonderful kindred spirit house keeper (yes I have a house keeper, we eat lunch with her every other Tuesday and anxiously await her arrival) . .told me about a great natural way to keep my stainless steel dishwasher finger print and smudge free for at least a couple of days.
Here is the before picture of my grubby stainless steel dishwasher, now when I went to take this picture I was very pleased to realize it wasn't all that bad, not good for my demonstration but oh well I will NOT complain!


So to clean the dishwasher and keep finger prints from showing immediately, mix 4 tablespoons of olive oil to 1 cup of water. This ratio works for me but feel free to experiment. Oh and I used the extra virgin olive oil I cook with. I put this in a $1.00 spray bottle I purchased from target and use it only about 2XS a week. Very easy and simple. The only other note I have is to shake the bottle a bit before spraying as obviously oil and water don't mix!
Below is the "after" picture!


Hope this is helpful, the tip made me love my wonderful house keeper even more!
Happy Sunday!

Monday, July 26, 2010

Mudroom Redo


I am going to apologize first, This is the wordiest post I have EVER done! Sorry about that but I thought maybe some of you could benefit from my quest for the best storage!!
I have been trying for years to renovate our mudroom. I took better before pictures but can't find them now! bummed! It has gone through many phases and storage ideas. I tried a table that was meant for the kitchen that was bar height to be used to pay bills etc. .. . We ended up using this as a dumping ground. An in-expensive bench found at Lowes ended up have shoes piled in front of it instead of in it. When we renovated our Attic I had an estimate done for built in cabinets and the estimate came back at almost $4000! Really!!! I thought truly I can come up with something that will work for under that!
Well it took me 3 years and it is finally done! Here are two pictures and I will try my best to describe everything. I searched so long to pull everything together and truly one trip to Ikea and another to Target and we are set!
Here is what I purchase and the approximate price:
Ikea Aspelund 3 door Wardrobe $199
2 small chests from Ikea for His & Her shoes, $39/each
2 baskets from Ikea $16.99
From Target, Barrel Planter for $19.99, 3 plastic drawer organizers $6.99/each, 3M Hooks (4 pkgs) 2.99/each, Post It organizers 2 pkgs for total of $12.00
Thirty OneSquare Utility Totes $24.50 each
Now math is so not my strong point but I believe this adds up to around $460. So for less than $500 and a lot of sweat (and blood). I managed to do the mudroom and have great storage and looks to boot! :-) I will have to confess, we did barter out the painting with a friend. We exchanged a 1 year old love seat for his painting services. It was so worth it! I did however thanks to many of you blogging about it do the wainscoting all by myself. It isn't the most perfect job but I am very impressed with the outcome.
Here is a picture of the wardrobe from Ikea!

This room was very hard to take a picture of the whole thing! Along the one wall as you can see, I have the Ikea wardrobe, baskets as mentioned on top for storage, and on either side of the ward robe I have "his" and "her" chests that my kids can sit on if needed and store the adult shoes. The art of the "Big girl panties" I posted before hangs on my side and on the other side is my hubby's art. He is the CTO of his own company so yes I am married to a geek (and love him deeply for it)! I got the idea for the art on another blog that has the "Be Calm and Carry On" link to it. The message board is on the left hand side of the room and it came from my Grandfather's farm window. When I got it the glass was already out if it and I tacked a white erase board on the back and hung it. It keeps phone numbers handy.

The photos below are from the inside of the wardrobe. I tried to maximize as much storage of out this 3 door wardrobe as I could! It has a hanging bar up top behind the two far left doors (one of which is mirrored!). Inside this I have an area for my kids shoes (the thirty one organizers with their names on it) and the pink and blue bins are for mittens/hats. On the inside of these doors I laminated a page with the days of the week, put it on a clipboard and hung this on a 3m hook. I am making one for each child and hope this will help them remember assignments and other activities. Behind the 3rd door of the wardrobe there are shelves, my husband & I each have a storage tote from Thirty One that holds our mail, gloves other "crap":-) The middle and bottom shelf I have put our file with the bills extra paper for our printer that we have downstairs, and used the 3M hooks to hang scissors, keys etc . . On the inside of the third door I found these great pockets from Post It. I was going to make and hang fabric pockets but these were already made and at a total of $12, it was a good bargain. I have one for coupons, another for menus and another for hubby's mail.

Thursday, July 22, 2010

Freebie Friday!

Winner!: Tammy from Flat Creek Farm

Congratulations Tammy please send me an email with your mailing information and I will get this out to you right away!

Freebie Friday and Give-away!
Almost didn't make it this week! The dog days of summer are really biting me here in VA! I can't believe we are looking at a weekend of 100+ days! UGH!!! Seriously I have been wanting Fall since June 1!

I really loved doing the bottle cap project I posted previously. The hardest part of the whole project was getting the photos to the right size. So I thought I would offer up a sheet of images that you can print out and use easily for the project. Just right click on the image below and you should be able to open it and print it out.


Now on to the giveaway!!! I will randomly select one poster to receive a set of the pictured bottle cap magnets below. The winner will be announced on Sunday, so you have until then to post. Thought I would extend this since I was so late in posting! (Please only US mailing addresses!)

Tuesday, July 20, 2010

Bottle cap Magnet Project

Usually during the summer I like to do some crafts with my Kids. Last year I created some custom art for their play room. This summer I decided to try something I have seen and wanted to do for a while. I collected a ton of bottle caps last summer and we selected some images to put into our bottle caps to make magnets. Her are the how to with pictures! The hands are those of my 7 year old daughter. This was a very fun project for her (not the pouring of the resin that should be for an adult only)! My 3 year old of course wanted to be in on it too (in the next to last picture below) and he could operate the punch by pressing it against the table. As usual when doing crafts with kids, check your inner "Martha" at the door.
Materials: 1" circular punch, bottle caps (cleaned and not bent), glue, Resin & the catalyst, old cookie tray, magnets.

1) Select your photos and print. I used a photo editing tool to scale my photos down to 1.5" square.

2) Using a 1" circular punch to cut out your photos. (I wouldn't recommend hand cutting) The circular punch can be picked up for under $10 at any craft store that sells scrapbook products.

3) Glue down your photos to the inside of your bottle cap. Note: Wash your caps before using and use only those that are flat and not bent.

6) Using Clear Casting Resin & the catalyst, follow the directions and mix the two together. I used the measurements for the 1/4" single cast technique. When they say mix in a well ventilated area they mean. This stuff SMELLS!!! So I would use this either outside or in a well ventilated garage.

7) Use an old cookie tray and place the bottle caps on the tray. You want a very even surface, mine was not and some of them are filled incorrectly. Once the catalyst is mixed with the resin pour the solution into your bottle caps. Note: Use gloves and you do not want this stuff on your hands. You need to fill each cap to the top and not over.

8) Allow to set over night and then you can hot glue the magnets on the back. You can also create thumbtacks instead!

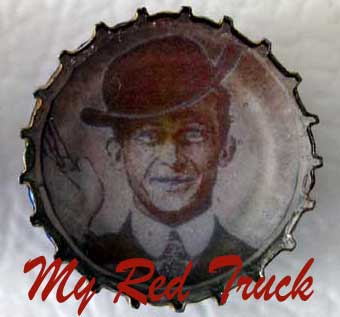
I am thinking of doing some for family Christmas presents. The best one is that of my great great grandfather and is in Sepia. There was some distortion of colors but I don't think I waited for the glue to dry. Have fun and if you try it let me see!!! :-)

Sunday, July 18, 2010

Art inspired yet again by my kids!

Okay for the last week I have felt like hollering "Put on our Big girl Panties and deal with it!" It seemed like everything my daughter decided was too hard she would give up on. This is not something new and totally against my personality which is to keep at it until you figure it out. . . . . .aka stubbornness. So I created this piece of art to hang in my newly remodeled mud room. I will see this every time I leave or enter the house, I figure it is a good mantra to head out the day with. While I was painting the panties my daughter came into the room and with a very concerned face asked "uh . . Mom why are you painting a pair of panties?" Made for a funny conversation. I plan on posting pics of the mud room later in the week as I am trying to put the finishing touches on it. Oh and I need ideas for a companion piece to hang on my husband's side of the room. Any ideas for funny but cute sayings with a masculine feel?
Thinking of offering this for sale in an Etsy store, so please tell me what you think!!!!